Pages

Showing posts with label pillow. Show all posts

Wednesday, March 20, 2013

sewing for therapy

As you have probably heard, Google reader is kicking the can. It will no longer be around after July... does that mean that if you follow with Google Friend Connect, that you will no longer get my posts? 
In any case, you can follow via Bloglovin' now.  That link is in the post below this one.

I've been busy trying to potty train my almost 3 year old and she is, well, doing good I guess, but it sure is making me cranky.  She doesn't seem to get that she has to tell me when she has to go, so I'm always taking her without her telling me she has to go.  If I leave her, she'll just go in her underwear.  Will she learn to tell me when she needs to use the toilet, or is that something they just are ready for or not?  First time potty-trainer here, so I could use a little help and encouragement.

Other than that, I've been trying to get some therapy by sewing.  Anything to brighten my mood.
I designed this maxi dress because I had some people asking me about making them for their girls.  It can be tied halter style or in the back with a bow on a loop coming up from the back. 


This was my prototype - I learned that I need to make the skirt a little wider.  Other than that, I am pretty happy with the design.

I'm also getting ready for the Spring Market put on by some ladies from my church.  That means making some more little dresses, but I'm also trying something new this year.  

Pillow covers.


Pluses - I'm really loving this one and almost don't want to put it up for sale!


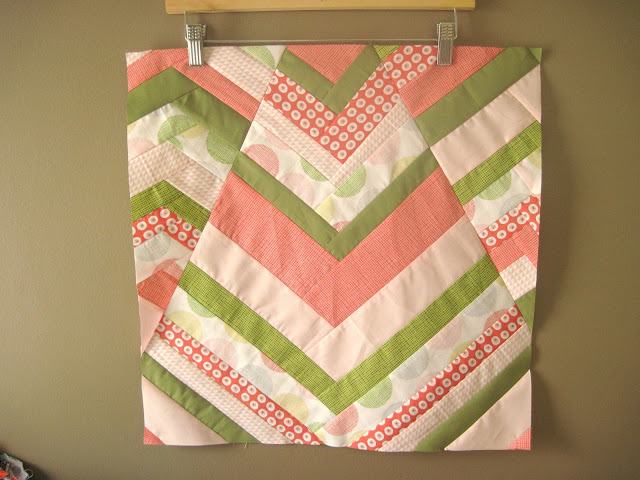
Improv Chevrons - tutorial from Six White Horses.

I quilted the chevron pillow cover with organic straight lines.  I thought it kind of went with the 'organic' chevrons.


Wednesday, November 28, 2012

pillows, a skirt, and a list

Is it really Wednesday today? I thought for some reason that it was Tuesday.  But Wednesday is a good day.  

My mom is moving into her new house next month and we're all excited for her.  She's been living in an old drafty house for the last bunch of years so this is a big step up for her. She's been busy choosing paint, light fixtures, flooring, curtains - all the fun stuff that comes with a new house.  
I thought her living room pillows needed an update as well, cuz, you know, they just won't match the 'new' anymore.  
So she and I went out to Fabricland last week and she picked out some fabrics for me to play with.  Her living room area is a cream colour with a rusty red/orange accent wall, so these fabrics fit perfectly.  She also didn't want complicated piecing or quilting on the covers, just simple stripes.  


First I did simple vertical stripes. 


Then I tried some angled stripes, but I think I like the vertical better.  I have three more covers to make and about three weeks left to do them in.  
I'll make it.  They'll get done since they're pretty simple and I can finish one up in an evening.
They will all have a hidden zipper closure on the back.  They are so easy to do I wish I had discovered earlier how to do the zipper thing for pillows.  It turns out way nicer than envelope style I think because with envelope style, sometimes the opening can gape just a little and it doesn't look as neat.  I followed this tutorial at Sew Mama Sew.

In the clothing department, I had an order for a skirt to finish up.  Just got it done this morning and I love how it turned out! 


It's the first time I made this pattern and I love it.  I might have to make it a regular in my shop, if there's enough interest.  
The pattern is the Aubrey Skirt from Sadie James Patterns on Etsy.  The only change I made was to the waistband.  Instead of measuring the waist and cutting the elastic for a personalized fit, I made it fully adjustable with buttonhole elastic.  For the rest, the pattern was super easy to follow and it only took me an evening and a morning to make.
For the next skirt though, I might use less than 40" widths worth of fabric as that makes it almost a little too full. 

I was also thinking the other night about what I all want to have finished before this baby comes.  
Ummm, my list is a little bigger than I thought!  Not bigger with stuff, just the stuff on it is big.

Just in case this one is a boy, I wanted to have a boy quilt done.  All I have right now is the fabric on a stack.  
I wanted to have the hexie playmat done, but it is being woefully ignored, for the past few months in fact.  I have a few hexies yet to piece on to the top and then I have to make a little 'quilt' out of it.
I want to have the Hexy MF top all pieced together.  I am almost done that, just have to put two more rows together and the hexy part is done.
And lastly, I wanted to have a toddler sized quilt for D finished so that her 'big' bed might be a little more attractive.  

At the rate I'm going, only the Hexy MF top will get done.  
*sigh*
No matter, I would rather the baby come a little sooner than get done all the things on my list.

Wednesday, October 17, 2012

updates

A post of updates here - all for projects that were started and are now finished - yay! 

First, I want to show you a picture of our little girl wearing the new shirt I made for her.  Turns out it fit her perfectly and looked gorgeous in all our family photos.


I am in love with this little girl and this picture.

I also finished my Modernista swap project.  A little iffy putting it up now because if my swap partner sees this she will absolutely know it's for her.  But I don't think she hangs around my blog at all, and I really want to share!

My partner really wanted a table cloth and her table was not too big, so I thought "I can do that."  
And I did.

Main fabrics are all Lou Lou Thi sashing and backing is Essex Linen.
I did a very simple design because some of the Lou Lou Thi prints are so large it's only fair to show them off as they are.  In the centre, I embroidered part of the Lord's Prayer, "Give us this day our daily bread." The embroidery would have worked better I think if I'd had some perle, but I only had floss, and there's no one local who sells perle.  


For the small items, I made some hotpads that have owl fabric for backing and the bunting I had made to fit over her window.

The second swap item I finished is the pillow cover for the Pillow Talk Swap.
My partner is so completely silent, I wonder sometimes if she is real.  No comments, no photos, nothing!  

Anyway, based on her mosaic these are colours she likes and she stated in her form that she liked geometric designs.  So here we have it.


Three 6inch hexagons with echo quilting, three rows of yellow pindot piping, and three smaller hexagons on three strips of Kona Coal.  Seems pretty geometric to me.  
Because the one side of the pillow is so densely quilted, I chose to do nothing around the small hexies - just the subtle lines of the strips pieced together.


It will fit a 20inch form, and I only had an 18inch form, so the cover is not stuffed well in these photos.  Too bad for that, because I would have loved to have seen this cover in all it's, um, 'glory'.

 That's it for swaps for me this year as I should be getting ready for the baby's arrival.
Only 10 more weeks!

Saturday, September 15, 2012

polaroids

The other day I received some squishy mail - it was a package from Debbie at A Quilter's Table filled with 40 polaroid blocks!

Debbie had set up this swap earlier in the summer and she had an overwhelming response as over 60 swapper signed up and she had to organize over 1000 blocks!  In July I had mailed off 40 blocks to swap for 40 different blocks and no I have an assortment of 40 blocks back.  Added to the doubles I made of the ones I sent, I now have 80 different blocks!  

Debbie also sent along a sweet little square of a polaroid to make an additional block.

I love this block!  So unique!

And remember I put this together when I was making my own blocks?


Well, last night I finally made something out of it.  The block had been sitting on my sewing table looking at me from under a stack of fabric for too long and I decided it needed to be used.  Turns out I had an old pillow laying around that needed a cover.  The pillow was almost the perfect size for the block and I only had to add a small strip of black sashing all the way around.

I then took the plunge that always scares me most - I quilted it.  I kept it minimal and only sewed around the polaroid square.


I used this old flannel I had in my stash for the... well, I don't know what it's called, but I used it here.  It was originally from my mom's stash so I have no idea where it's from, but now that I used it, I think it's kind of cute.

I made and envelope style back with black and this cream on dark brown text fabric that I picked up on our holiday to BC.  I only got a clearance FQ so there was no selvedge info.


I only had the one FQ of the text fabric and then I ended up cutting it wrong!  So instead of the writing reading left to right when the pillow is right side up, you have to turn the pillow. Oh well, nobody'll care, right?

Here's the finished pillow sitting on my couch.


That makes two nice pillows in my living room and they are both completely different.  The other is the pink chevron pillow I made last winter.  But really, I don't have a theme or anything going on anyway, so in that case everything matches!

And now that got to play with polaroids again and fell in love with them all over again, I, ahem, joined a second polaroid swap, the Say Cheese! Polaroid Block Swap.  I know - what am I doing!  I am busy enough!  
This one is based out of Australia and is mainly for Aussies, but they let me be an honourary Aussie.  So, another 35 blocks are going out and coming back!

Saturday, December 24, 2011

A Wedding Gift

Yesterday I went to the wedding of a friend.  She and I lived together for two years while going to our respective universities.  It was a good time and we were always trying to have the last word and had a lot of witty word wars.  I have to admit, she was a worthy opponent and gave me a run for my money.  

Somehow, though, I seem to remember, that I usually won out. 

Anyway, yesterday was the day she married her man and I thought that deserved a gift from the heart, something handmade.

She did have a registry at Home Outfitters, and I looked at the list and saw that she had herringbone pillows on her list.  I was a little miffed that I could not see a picture of them, even when I googled them.  So, I made my own version of Home Outfitters herringbone pillows.  Hopefully they are close to the real thing.

I searched online for a picture and then a tutorial and found this one at Our Humble A{Bowe}d.  It looked easy enough, though time consuming.  I think the pillows she wanted were red and black, so I made two pillow covers, one red with black stitching and one black with red stitching.  

I like them and kinda wanted to keep them.  But I have that with almost anything I make.  

I cut 4inch stripes, ironed them in half and pinned and sewed, pinned and sewed.


It was a lot of pinning and sewing.  As I said, easy enough, but time consuming.


I used the envelope style closure on the pillows again and I love how they turned out!


I wasn't sure I would like a black pillow, but I think I like this one better than the red!


Tomorrow, Christmas Day, we remember and celebrate the birth of Jesus Christ our Saviour. 

From Luke chapter 2: 
 8 And there were shepherds living out in the fields nearby, keeping watch over their flocks at night. 9 An angel of the Lord appeared to them, and the glory of the Lord shone around them, and they were terrified. 10 But the angel said to them, “Do not be afraid. I bring you good news that will cause great joy for all the people. 11 Today in the town of David a Savior has been born to you; he is the Messiah, the Lord. 12 This will be a sign to you: You will find a baby wrapped in cloths and lying in a manger.”
 13 Suddenly a great company of the heavenly host appeared with the angel, praising God and saying,
 14 “Glory to God in the highest heaven,
   and on earth peace to those on whom his favor rests.”

Thursday, December 8, 2011

The Pink Pillow

On Wednesday, I posted my W.i.P - the chevron pillow. It is done now!

Am I quick or what?!  Yeah, um... Let's move on.

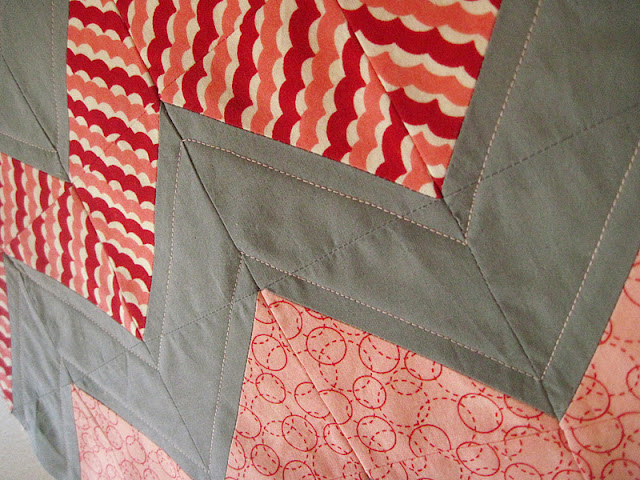
I wanted to make the pillow top a little heavier than just cotton, and I wanted to cover up all the seams on the back from piecing, so I quilted on a piece of batting.  Simple straight lines following the gray stripes.

Turned out kind of pretty, I think.  I chose to have the topstitching in pink to tie the pink fabrics and the gray together.

Then I decided to try something new (again) and add binding to the pillow rather than just do the sew and turn method.  (Is that even what you call it?  I'm going with it.)


I wasn't sure about the binding though once I had it basted on. It seemed to make things a little too pink.  Then I went through the work of handstitching the binding on so there are no sewing marks at all on the binding.  
Wow!  So many new things for me!  

I think it turned out nice.  Still not 100% on the binding colour.  It's not as 'hot pink' as it looks in the picture.  I think it's growing on me.

Moving on to the outdoors... We had a bit of chilly day here.  I have ice on my front window.  This is the most ice I have had on it yet this winter.  


I'm hoping for a new window next year.

Friday, December 2, 2011

'Tis Done

 So, it is finished.  My cathedral window pillow cover is finished. 
 

I decided to make an envelope style cover and it worked much better than my first envelope pillow. 
I made sure to leave plenty of overlap this time. 
Yeah, you win some, you lose some.
 
The stinker just had to be in the photo.  Worked rather well since she even posed (gasp!).

Earlier this month I also made some slingers.  These things are nearly impossible to take pictures of, so pardon the less than stellar photos.  But you get the idea. 


I simply cut two triangles of fabric, sewed them together, and then sewed them into some thin bias tape.
Before I sewed them into the bias tape, I used some Wonderunder to secure the triangles to the tape.  I used 1/4 inch bias tape and didn't want to risk the triangles moving out of place and than me having wonky slingers.


I kinda like them.


Better than the plastic ones you can buy in stores.